7.30.2013

Ledge Village Train Station • Silhouette Tutorial

Project Description: 

The Ledge Village is series of 3D buildings and accessories that can be combined in a mix and match fashion to build tiny villages on small ledges around your home.  The buildings are thin, with all detail on the front so they fit on small trim ledges.  This tutorial is for the village train station, including platform and clock.


Other files in the series include:
And there are more to come!

Here is a view of my growing ledge village......


Train Station Tutorial

Note:
I am a new Silhouette Contributing Artist. Both my Silhouette files and this website are the beginning. Send along any suggestions, problems, ideas or photos as we learn to create together. I'd love to hear from you!  Marji Roy 
eMail: ashbeedesignemail@gmail.com
Tutorial assembled using Silhouette Software Release 2.7.18. This tutorial assumes you already know how to use the Silhouette and Silhouette software.

Supplies Needed:

  • Template from Silhouette On-Line Store here.
  • Glue dots 3/16"
  • Silhouette Cameo or Portrait
  • Card Stock 

Steps for completing the 3-D Train Station:


1. Download the cutting file for your Silhouette Cutting machine from the Silhouette Online Store here.

2. Prepare the files:
  • The downloaded Silhouette file for the train looks like this. 


  • It is laid out on a 12 x 24" mat and needs to be split into three separate files for cutting. Each file will fit on an 8.5 x 11" piece of card stock so it will work on both a Cameo and Portrait cutting machine.
  • Copy the Station front and platform shape and paste it into a new file.
  • Copy the station back and under roof shape and paste it into a new file.
  • Copy the remaining outer roofs, posts and clock and paste that into a new file.
3. Cut the files.
  • The settings will depend on the paper you use. I have been using white index card stock and cutting at a speed of 3, a depth of 33 and the blade set to 3.
  • Carefully remove the cut files from the backing mat.
  • Here are the parts for this project. 

4. Attach the clock.

  • This is a simple first step.
  • It is easier to do before you assemble the building.
  • Put glue on the back of the clock piece and glue it into the center of the clock tower on the station.


5. Fold the Station front and platform.
  • Note each cut file has dotted lines. These are fold lines. 
  • Fold all the dotted lines inward except the main platform fold (between station floor and platform) and that folds in the opposite direction.


6. Glue the platform rectangle together.
  • I like to use Glue Dots on the edges although other glue types are appropriate. 
  • It is important to make square corners. The platform is a long rectangle along the bottom.
  • Place glue dots along the long edge.


  • Fold it around and make the rectangular platform, pressing the glue dots in place.
  • Add glue dots to the tiny tabs on the ends and slide them in to finish off each end of the platform.


  • Next fold the platform under the building and glue it there.


7. Construct the front of the building.
  • Glue up the side wall tab on both the left and right side of the station. These are small tabs at the bottom of the side walls and they get glued to the floor of the station.  
  • It is important to keep things square.

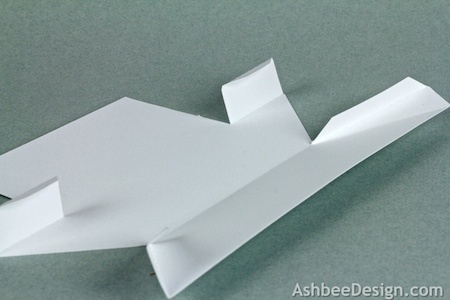
  • Glue the roof of the clock tower together. Glue the two tabs of the peak to the roof flaps and then the one tab at the peak.


  • Front view of the clock tower glued together. Fold the flaps out.


8. Add the back and under roof.
  • Put the front to the side and start to assemble the back and roof piece.
  • Fold all the fold lines in.


  • Place the roof in position before putting any glue dots on it.
  • It slides behind the clock tower. The 4 tabs on the clock tower fold out and are visible.


  • Start gluing at the base of the back. This will help you center the roof piece. The bottom edge of the back lines up with the bottom edge of the platform. Put a row of glue dots here and along the two sides and press into place being careful to line things up.


  • There are two tabs on the front wall that slide under the roof to the right and left of the clock tower.
  • Slide those in place and glue.
  • The front of this under roof should line up with the top of the front wall.
  • Put glue dots under the 4 visible tabs of the clock tower and glue that in place.
  • The peak of the clock tower is just below the ridge line.


  • You can reach in through the door to press all seams in place.
  • There are is a tab under the roof at both ends of the building that now get glued in place.


9. Add the posts.
  • There is a left and right post piece.
  • Each is folded on the dotted lines.
  • The large tab gets glued directly to the back of the station.

  • I cut mini glue dots in half and used them to attach the bottom connector to the back and end of the platform.
  • Use a cut mini glue dot to attach the front post to the front of the station.
  • Do the same for the post pieces at both ends of the station.


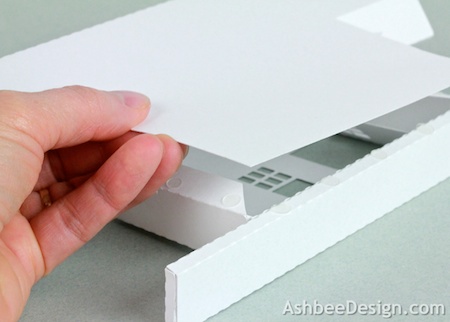
10. Add the top roof pieces.
  • There are two top roof pieces to be added. Both have a couple of simple folds.


  • The larger roof piece fits over the front of the main roof.
  • It is positioned around the clock tower and covers the glue tabs of the tower.
  • Put a lot of glue dots on it and press it into position.

    • The smaller piece covers the top of the clock tower .
    • Put a few glue dots on it and press it into position.


    And your train station is complete!


    Place on the ledge with other buildings from Ledge Village.
    • I use Blu Tak or a similar product to attach to the walls with a material that doesn't damage the wall and is easy to re-position.


    **********
    © 2013 Marji Roy, Ashbee Design


    7.28.2013

    3D Arrow Boxes • Colorful and Dynamic

    The cutting file should be appearing at the Silhouette Store some time on July 29th.

    Project Description: 

    My design work took a left turn yesterday and I created this arrow shaped box.......and then I created 3 more in a color gradation. This project is a simple 3D construction file. When finished, the arrow stands about 7.5" tall. The file contains the parts for a top and bottom to create the arrow box. Its visual complexity comes when you make multiples and display them together. This pattern is both Portrait and Cameo friendly.


    I was immediately taken by the strong graphic elements and the display potential. Yes, they are boxes and can be used as such. 


    But they can also be displayed as wall art.......


    In more than one orientation!


    Or as table decor....

    So cool.

    3d Arrow Box Tutorial:

    Note: I am a new Silhouette Contributing Artist. Both my Silhouette files and this website are the beginning. Send along any suggestions, problems, ideas or photos as we learn to create together. I'd love to hear from you!  Marji Roy
    eMail: ashbeedesignemail@gmail.com
    Tutorial assembled using Silhouette Software Release 2.7.18. This tutorial assumes you already know how to use the Silhouette and Silhouette software.

    Supplies Needed:

    • Template from Silhouette On-Line Store here.
    • Glue dots 3/16"
    • Silhouette Cameo or Portrait
    • 2 sheets of 8.5 x 11" Card Stock for each arrow

    Steps for completing the 3-D Arrow Box project:

    1. Download the cutting file for your Silhouette Cutting machine from the Silhouette Online Store here.


    2. Prepare and cut the file.
    • If using a Cameo, copy and paste the Outside box pieces to a new file. Each set will fit on one 12 x 12" page.
    • If using a Portrait, copy and paste each arrow base into its own file, and each pair of sides into their own 8.5 x 11" files. Each box will take four 8.5 x 11" pieces of card stock.
    • Use card stock. Cut settings will depend on your card stock thickness. I used speed of 3, depth of 33 and blade set at 3.
    • Here are the cut shapes for both the top and bottom of the box.


    • Look carefully and you will notice notches on one tab of each piece. They do not line up but identify which pieces go in the same set.
    • The 3 pieces with 1 notch go together, and the 3 pieces with 2 notches go together.
    • The pieces have a slight size difference but otherwise match so it is important to pay attention to the notches.


    3. Fold and assemble one box half.
    • Note each cut file has dotted cut lines. These are fold lines. 
    • Fold all the tabs and sides of the arrow up and in.
    • Using glue dots, glue the tab at the point in place.
    • Be careful to keep things square.


    • Next add one side piece. It folds in a zig zag as shown with the tabs folded in.


    • Start at the end near the point and glue the side seam together.
    • Then glue it to the base arrow.


    • Continue attaching this piece by gluing the long side in place.

    • Glue the bottom edge of this side in place then start on the other side.
    • Fold the piece before gluing to make sure everything goes in the correct direction.


    • Attach the second side in the same order as the first.


    • Glue the last tab at the bottom center in place.


    • Do this to both the left and right sides of the chair seat front.

    4. Fold and assemble the other box half.
    • Complete the second half of the box following the same steps .
    • The half with one notch is slightly smaller and goes inside the half with two notches and the semi-circles finger holds..


    The finished box can stand on its own.


    4. Make more for interesting arrangments.


    **********
    © 2013 Marji Roy, Ashbee Design


    Classic Outhouse

    Project Description: 
    I designed an outhouse to go with Ledge Village but this is NOT that design. (Here is a link to that one.) While doing so I just knew there was a place for a classic outhouse, one that wasn't truncated to fit on the ledge. This is that design, an old-fashioned outhouse. It is a one-holer and set for all the humorous applications you can think of for it. It is an easy to assemble beginner level 3D building project and is both Cameo and Portrait friendly.


    Supplies Needed:

    • Template from Silhouette On-Line Store here.
    • Glue dots 3/16"
    • Silhouette Cameo or Portrait
    • Card Stock - Brown, green and black

    Steps for completing the 3-D Outhouse:

    1. Download the cutting file for your Silhouette Cutting machine from 3DCuts.com here. It is also available at the Silhouette online Store.

    2. Prepare the files:
    • The downloaded Silhouette file for the Outhouse looks like this. 

    It fits on a 8.5 x 11 sheet of card stock so it can be cut on either a Portrait or Cameo cutting machine. 
    3. Separate and cut the files.
    • The settings will depend on the paper you use. I have been using card stock and cutting at a speed of 3, a depth of 33 and the blade set to 3.
    • Copy the grass and paste it to its own file which will be cut in green.
    • Copy the roof, paste it into its own file and cut from black
    • Cut just the main building piece from brown.
    • Carefully remove the cut files from the backing mat.
    • Here are the parts for this building project. Grass is not shown because I added that later.


    4. Fold the outhouse.
    • Note each cut file has dotted lines. These are fold lines. 
    • Fold all the dotted lines inward.


    5. Glue all seams starting with the seat. 

    • I like to use Glue Dots on the edges although other glue types are appropriate. 

    • It is important to make square corners. I start at the bottom and get that even and then move up to the roof line. For this project, fold the seat into place first and glue that. 

    • Next glue the bottom to the sides.


    • Then glue up the long side seam also adding a few glue dots to the bottom of the seat to attach it to the floor.


    • Glue the roof in place. It is easiest to glue the roof portion with 3 tabs first and then glue the roof portion with 2 tabs second.


    • You can reach in through the door to press all seams in place.
    • Add the top roof. It has an over hang in both the front and back.

    • Glue the grass around the base.

    • All Done!

    Have fun with it!

    **********
    © 2013 Marji Roy, Ashbee Design