8.25.2013

Ledge Village • Haunted Tree


Part 3 of tutorial for Haunted Mansion: 

Go HERE for Part 1.
Go HERE for Part 2.

Steps for completing the Haunted Mansion Accessories:

Note: This tutorial is separated into three blog posts because of the number of photographs. This is part 3.


1. Part 1 and 2: You should have the mansion all assembled from the steps covered in Part 1 and Part 2.

2. Download and cut the files for this project.
  • Download the Haunted tree cutting file here.
  • I used a heavier card stock for the tree. I find the better quality card stock cuts fine lines better. 
  • You are to cut three identical trees. Peel them away from the cutting mat with extreme care although it really doesn't impact the design if a branch or two doesn't make it. 
    Here are all the cut parts.

3. Assemble the tree.
  • There are 3 tree pieces. Two get folded along the dotted line and one stays flat.


  • The 3 trees will be glued together as shown in the following diagram. This is a view looking up from the bottom. The flat tree with no fold (black) will be on the back. One tree will be folded and glued to the left half (red in diagram) of the flat tree.
  • The other tree will be folded and glued to the other half (blue in diagram). You glue the side that matches the branch shapes on the back piece.


  • Apply glue to one half. Place the folded tree on it.

  • Repeat with the tree on the other half.
  • I chose to cut a few of the lower branches off the front folds of the tree. My goal was to make it look like it had just two "arms".


4. Assemble the bat.


  • Assemble the bat by putting a glue dot inside the head, add a piece of thread or monofilament to the glue dot and then fold the bat together. The glue dot will hold the thread.
  • Put a glue dot high up in the tree and attach the other end of the thread to that allowing the bat to fly freely below the tree,

5. Assemble the grave stone.
  • Put a glue dot in the middle top.
  • Fold on the fold lines and glue the two sides together.


  • Put the accessories together with the haunted mansion. 

Set it up free-standing or up on a trim ledge........


**********
© 2013 Marji Roy, Ashbee Design


Ledge Village Haunted Mansion Part 2

Part 2 of tutorial for Haunted Mansion: 

Go HERE for Part 1.
Click HERE for instructions on assembling the haunted tree and grave stone.


Steps for completing the Haunted Mansion:

Note: This tutorial is separated into three blog posts because of the number of photographs. This is part 2.


1. Part 1: You should have the mansion and tower assembled and attached to each other before starting this series of steps. Those directions are in Part 1.

2. Attach the porch railings.
  • Fold along all the dotted lines on the porch railing piece. Notice in the picture that I have folded the tabs on the top in different directions.
  • Note: I added a tab to the end of the railing bottom. This will extend out and can be glued to the bottom of the tower. It will add more strength to the structure. I did this after the photo session so it isn't shown below.


  • The porch railing is glued to the bottom of the porch floor. It wraps up and around the porch. Put glue dots along the front of the porch bottom and attach the railing piece there.

  • Here is a view of the porch in place without the roof.

  • Fold on all the porch roof fold lines. They all go down. The roof will wrap around the house.

  • There is a long tab on the back side of the roof that folds down and gets glued to the front wall of the mansion.
  • There is a shorter tab that gets glued to the side wall.
  • Glue those in place and slant the roof down to meet the top of the railing piece.

  • There are two tabs on the top of the railing piece that were folded forward. Those you still have access to. Put a glue dot on each and glue the porch roof down in front.

  • The back corner of the black porch roof wraps around back and forms a tab to glue in place there as well.

  • Fold the top roof piece along the fold line and fit onto the roof. The straight edge goes toward the back. The shorter side goes toward the tower. Glue this in place.


  • The roof is slit in 3 areas. Bend down the slits to create the appearance of hanging lumber in each of the 3 places. (one on each roof area).
  • The haunted mansion is now assembled. If you downloaded the haunted tree, fence and grave stone file you can proceed to those directions below.


Continue on to Part 3:

I am separating this tutorial into three blog posts because of the number of pictures.
Click HERE for instructions on assembling the haunted tree and grave stone.

**********
© 2013 Marji Roy, Ashbee Design


Ledge Village Haunted Mansion and Tower House Tutorial

It is up finally. Link to the Haunted House cutting file here! And the Tower House cutting file here!

Project Description: 
The Ledge Village is series of 3D buildings and accessories that can be combined in a mix and match fashion to build tiny villages on small ledges around your home. The buildings are thin, with all detail on the front so they fit on small trim ledges. This tutorial is for the haunted mansion and the Tower House. I designed the haunted house first but then requests came in to make the same design in an unhaunted version. It is called the Tower House. The haunted house works well as a stand alone project for the Halloween season. Or you can combine it with other buildings to create an entire village. There are two files for this project. One includes the house and other includes the haunted tree, fences and grave marker.


An the "unhaunted" version!


Other files in the Ledge Village series include:
And there are more to come!

Haunted Mansion Tutorial

Note:
I am a new Silhouette Contributing Artist (getting less so with each new edition!). Both my Silhouette files and this website are the beginning. Send along any suggestions, problems, ideas or photos as we learn to create together. I'd love to hear from you!  Marji Roy 
eMail: ashbeedesignemail@gmail.com
Tutorial assembled using Silhouette Software Release 2.7.18. This tutorial assumes you already know how to use the Silhouette and Silhouette software.

Supplies Needed:

  • Template from Silhouette On-Line Store.
    • Haunted House cutting file here  • House Tutorial Below
    • Tree cutting file here • Tree Tutorial HERE
    • Unhaunted version here
  • Glue dots 3/16"
  • Silhouette Cameo or Portrait
  • Card Stock - gray and black

Steps for completing the Haunted Mansion:

Note: This tutorial is separated into three blog posts because of the number of photographs.

1. Download the cutting file for your Silhouette Cutting machine from the Silhouette Online Store here. There are two files to get.

2. Prepare the files:
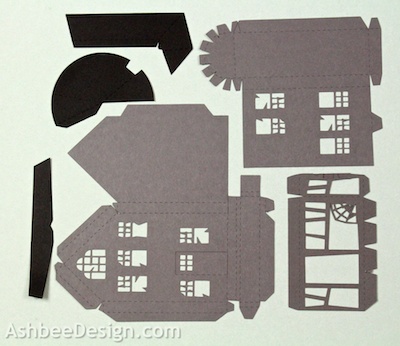
  • The downloaded Silhouette file for the haunted mansion looks like this EXCEPT ALL LINES ARE RED.  The parts fit on the 8.5 x 11" paper so it will work on both Cameo and Portrait cutting machines without resizing. You will have to separate pieces by copying and pasting into new files to use smaller paper but also to use different colors. In my sample all the items shown in blue below were cut from dark gray and all the items shown in red were cut from black. Other combinations would work as well.


3. Cut the files.
  • The settings will depend on the paper you use. I have been using card stock and cutting at a speed of 3, a depth of 33 and the blade set to 3.
  • Carefully remove the cut files from the backing mat.
  • Here are the parts for this project.  Notice, I chose to cut the roof pieces out of black and all the other pieces out of dark gray.


4. Fold the mansion main building.
  • Note each cut file has dotted lines. These are fold lines. 
  • Fold all the dotted lines inward except the porch floor. That folds in the opposite direction coming forward from the building.


5. Glue the base and porch floor together.
  • I like to use Glue Dots on the edges although other glue types are appropriate. 
  • It is less important to make square corners on this design because slightly crooked adds to the haunted feel.
  • You start this building by positioning the floor. Fold the floor forward, then down, then back. Fold in the end and glue in place.

  • Fold over the building side and glue that tab in place.


  • The other end of the porch floor is different because there is a wrap around porch on this end. 
  • The large end tab gets glued on top to blend the edges together after you have folded it into position.


  • After the floor is together, glue the peak tab together.

  • Then add glue dots to all of the tabs on the back. This includes the bottom, one long side and two roof tabs.

  • Postion the back over the glue dots and press to hold. Notice there is a tab sticking out to the side. This is where the tower will attach.


6. Assemble the tower and attach:
  • Fold along all the fold lines of the tower. All things get folded in expect one little center tab at the top.

  • Start by gluing the cross brace at the top in place. It folds forward and then the two side tabs are glued.

  • Fold up the tabs on the bottom circle of the tower. Put a glue dot on every one.


  • Wrap the tower wall around the base attaching it to these glue dots as you go.
  • When you get to long edge, add glue dots there and glue the tower wall in place.

  • The cone for the tower roof is flat on the back.  Fold on the dotted lines. ( Note, I moved the location of the split board in the roof after taking this photo. It is further to the right so it won't interfere with the tab.


  • Glue the back of the tower roof to the back of the tower. 

  • Glue the front tab on the tower to the underside of the roof to hold the cap down.

  • Glue the tower to the main mansion building. Put glue dots along the side of the building but also on the connector tab on the backside.
  • Back view of connected tower:
Continue on to Part 2:

I am separating this tutorial into three blog posts because of the number of pictures.
Click HERE to get instructions on adding the front porch.
Click HERE for instructions on assembling the haunted tree and grave stone.


**********
© 2013 Marji Roy, Ashbee Design


8.19.2013

Ledge Village Fire House Silhouette Tutorial


Project Description: 
The Ledge Village is series of 3D buildings and accessories that can be combined in a mix and match fashion to build tiny villages on small ledges around your home. The buildings are thin, with all detail on the front so they fit on small trim ledges. This tutorial is for the fire house to help expand the Ledge Village town center. It is sized to work on both Cameo and Portrait cutting machines.


Other files in the series include:
And there are more to come!

Here are views of my growing ledge village......


Fire House Tutorial

Note:
I am a new Silhouette Contributing Artist (getting less so with each new edition!). Both my Silhouette files and this website are the beginning. Send along any suggestions, problems, ideas or photos as we learn to create together. I'd love to hear from you!  Marji Roy 
eMail: ashbeedesignemail@gmail.com
Tutorial assembled using Silhouette Software Release 2.7.18. This tutorial assumes you already know how to use the Silhouette and Silhouette software.

Supplies Needed:

  • Template from Silhouette On-Line Store here.
  • Glue dots 3/16"
  • Silhouette Cameo or Portrait
  • Card Stock 

Steps for completing the Fire House:


1. Download the cutting file for your Silhouette Cutting machine from the Silhouette Online Store here.

2. Prepare the files:
  • The downloaded Silhouette file for the fire house looks like this.  It fits on the 8.5 x 11" paper so will work on both Cameo and Portrait cutting machines without resizing.


3. Cut the files.
  • The settings will depend on the paper you use. I have been using white index card stock and cutting at a speed of 3, a depth of 33 and the blade set to 3.
  • Carefully remove the cut files from the backing mat.
  • Here are the parts for this project. 


4. Fold the Station front.
  • Note each cut file has dotted lines. These are fold lines. 
  • Fold all the dotted lines inward except the front inset going back to the tower door. That folds in the opposite direction.


6. Glue the station front together.
  • I like to use Glue Dots on the edges although other glue types are appropriate. 
  • It is important to make square corners. 
  • You start this building by positioning the floor. Start at the large door end and using glue dots, glue the tab so as to create the square corner.

  • Next position the floor in the corner that steps back from the double doors to the single tower door. This is where you'll see how one of the folds needs to go in the opposite direction.
  • Glue that in place along with the tabs next to the double door.


  • Finish the last corner for attaching the floor base.

  • Next glue up the long side seam, attaching the back to the side.  Keep things square.

  • Glue the peak of the tower together.......


  • And then glue the peak under-roof to the back.


  • Add glue dots to the tab on the roof and glue that behind the front wall.

  • The decorative cornice just gets glued to the front.


  • The roof cover is longer on one side than the other.  The long side goes to the outside of the building and the short side goes in toward the center.
  • Glue the roof cover in place with the over-hang all on the front.


  • Done!


Add a tree or some fencing from some of the other files down-loaded for Ledge Village.


Place on the ledge with other buildings from Ledge Village.
  • I use Blu Tak or a similar product to attach to the walls with a material that doesn't damage the wall and is easy to re-position.


**********
© 2013 Marji Roy, Ashbee Design